Scale Out Your MySQL NDB Cluster In Few Easy Steps ...
In this blog, we will discuss about how to scale out MySQL NDB Cluster in few easy steps. The use cases could be, when user business applications demand massive expansion and the existing cluster may not able to handle the request in that case a cluster scaling is needed. This is an online procedure i.e. zero cluster downtime so that user’s business won’t affect while this scaling process is going on.
In the below demo, we will see, how to scale from a 4 nodes cluster to 8 nodes cluster while transactions are going on.
Let’s create a MySQL NDB Cluster with the following environment.
Let’s start a 4 nodes cluster.

Step 2: Let’s create database, table and some operations on it
Let’s create a database ‘test1’, table ‘t1’ and insert rows into table ‘t1’ continuously. I am using a tool to insert rows, can also be done through any script.

Step 3: Let’s modify the cluster configuration file (config.ini)
Let’s modify the cluster configuration file to accommodate new data nodes into it. Here, we will add another 4 data nodes to the existing 4 data nodes cluster. We just need to add the NodeId and the hostname for the new data nodes in the configuration file (config.ini).

Step 4: Let’s restart management node
Once we have done with adding new data nodes details into the config.ini file then restart the management node with –reload option so that the new changes will take into effect. If there are multiple management nodes then each management node should stop and start with –reload option one by one (rolling restart way).
From the management client, stop the management node:
ndb_mgm> 254 stop

Then restart the management node with –reload option:
BASE_DIR (management node)>
bin/ndb_mgmd \
--config-file={BASE_DIR}/mgmt_data/mgmt_config.ini \
--config-dir={BASE_DIR}/tmp \
--reload --ndb-nodeid=254

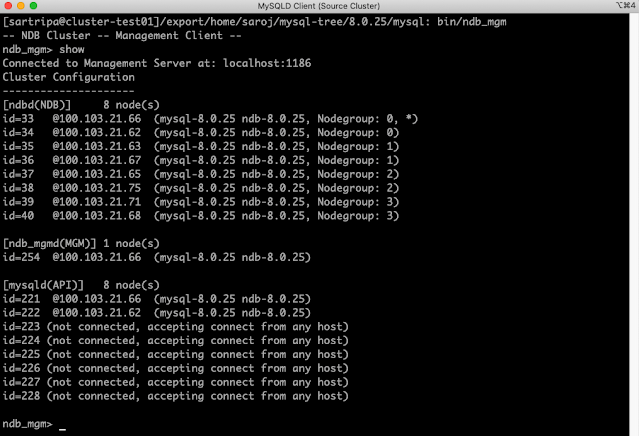
Now let’s look at the cluster after restarting the management server:

From the above image, we can see that, management node has been started and 4 new nodes also included into the cluster but all are in disconnected state.
Step 5: Rolling restart of all the existing data nodes
In this step, we will restart all the existing data nodes one by one i.e. stop and start each data node which is also called rolling restart process. These data nodes can be restarted with –initial or without –initial option. There are various ways user can do it.
a) From the management client, we can issue ‘stop’ command and restart it from the data node.
ndb_mgm> 33 stop
BASE_DIR (data node 1)>
bin/ndbmtd -n --ndb-connectstring=management_hostname:1186
b) Can issue a ‘restart’ command from the management client.
ndb_mgm> 33 restart

Let’s finish the remaining data nodes restart.
Step 6: Rolling restart of MySQLD nodes
After data nodes restart finished, next step is to restart all the MySQLD server one by one.
Stop the MySQLD server:
BASE_DIR (MySQLD)> bin/mysqladmin -u root -P"13010" shutdown
Start the MySQLD server:
BASE_DIR (MySQLD)>
bin/mysqld --defaults-file=/export/home/saroj/mysql-tree/8.0.25/mysql/my.cnf &
Step 7: Start all the data nodes that are newly added
In the config file, we have added 4 new data nodes, now it’s their turn to start with –initial option.
BASE_DIR (Data Node 5)>
bin/ndbmtd --ndb-connectstring=cluster-test01:1186 --initial

Do the restart for remaining three data nodes. Let’s look at the cluster at this stage:

From the above image, we can see that all the new nodes have been finished their restart process.
Step 8: Create new nodegroups
From the above step, we can see that new nodes are added but not part of any nodegroup (no nodegroup). Let’s create a nodegroup to add these new nodes. This can be achieved through ‘create nodegroup’ command.
ndb_mgm> create nodegroup 37,38
ndb_mgm> create nodegroup 39,40
where 37, 38 and 39, 40 are the node id of newly added data nodes.

After the nodegroups created, let’s look at the cluster state:
From the above image we can see that nodegroup 2 and 3 has been created.
Step 9: Reorganize the partition table
Now in the cluster we have 8 data nodes and out of which 4 data nodes which are recently added are empty while the other 4 data nodes contains all the table data. So let’s redistributed the data among all the data nodes. This can be done through MySQL command ‘ALTER TABLE ... REORGANIZE PARTITION’. This command should run for all the tables in each database.
mysql> ALTER TABLE t1 REORGANIZE PARTITION;

After the table reorganization is completed, let’s check the memory report from the management client i.e.
ndb_mgm> all report memory

From the above image we can see that table data has been redistributed among all the data nodes. The old data nodes (where memory usages is still showing 31%) is not yet released the space that it occupied after the table reorganization. This space can be reclaim by the command ‘optimize table’.
Step 10: Reclaim the space from the old data nodes
As we saw above, even after reorganization finished, the space is not yet released by the old data nodes (from memory report: 31% usages). This can be achieved through ‘optimize table’ command. This command should run for all the tables in each database.
mysql> OPTIMIZE TABLE t1;

Now let’s check the memory report from the cluster:

From the above image, we can see that, for the old data nodes, memory usages has been reduced from 31% to 25% i.e. 6% of memory space reclaimed by the optimize table command.
Let’s look at the cluster once again after adding 4 new data nodes:

Now it is an ‘8’ nodes cluster scaling from a ‘4’ nodes cluster without any downtime to the running cluster.
This concludes our discussion on MySQL NDB Cluster scaling.
In the below demo, we will see, how to scale from a 4 nodes cluster to 8 nodes cluster while transactions are going on.
Let’s create a MySQL NDB Cluster with the following environment.
- MySQL NDB Cluster version (Latest GA version)
- 1 Management node
- 4 Data nodes
- 1 MySQLDs
- Configuration slots for up to 4 additional API nodes
Let’s start a 4 nodes cluster.
Step 2: Let’s create database, table and some operations on it
Let’s create a database ‘test1’, table ‘t1’ and insert rows into table ‘t1’ continuously. I am using a tool to insert rows, can also be done through any script.
Step 3: Let’s modify the cluster configuration file (config.ini)
Let’s modify the cluster configuration file to accommodate new data nodes into it. Here, we will add another 4 data nodes to the existing 4 data nodes cluster. We just need to add the NodeId and the hostname for the new data nodes in the configuration file (config.ini).
Step 4: Let’s restart management node
Once we have done with adding new data nodes details into the config.ini file then restart the management node with –reload option so that the new changes will take into effect. If there are multiple management nodes then each management node should stop and start with –reload option one by one (rolling restart way).
From the management client, stop the management node:
ndb_mgm> 254 stop
Then restart the management node with –reload option:
BASE_DIR (management node)>
bin/ndb_mgmd \
--config-file={BASE_DIR}/mgmt_data/mgmt_config.ini \
--config-dir={BASE_DIR}/tmp \
--reload --ndb-nodeid=254
Now let’s look at the cluster after restarting the management server:
From the above image, we can see that, management node has been started and 4 new nodes also included into the cluster but all are in disconnected state.
Step 5: Rolling restart of all the existing data nodes
In this step, we will restart all the existing data nodes one by one i.e. stop and start each data node which is also called rolling restart process. These data nodes can be restarted with –initial or without –initial option. There are various ways user can do it.
a) From the management client, we can issue ‘stop’ command and restart it from the data node.
ndb_mgm> 33 stop
BASE_DIR (data node 1)>
bin/ndbmtd -n --ndb-connectstring=management_hostname:1186
b) Can issue a ‘restart’ command from the management client.
ndb_mgm> 33 restart
Let’s finish the remaining data nodes restart.
Step 6: Rolling restart of MySQLD nodes
After data nodes restart finished, next step is to restart all the MySQLD server one by one.
Stop the MySQLD server:
BASE_DIR (MySQLD)> bin/mysqladmin -u root -P"13010" shutdown
Start the MySQLD server:
BASE_DIR (MySQLD)>
bin/mysqld --defaults-file=/export/home/saroj/mysql-tree/8.0.25/mysql/my.cnf &
Step 7: Start all the data nodes that are newly added
In the config file, we have added 4 new data nodes, now it’s their turn to start with –initial option.
BASE_DIR (Data Node 5)>
bin/ndbmtd --ndb-connectstring=cluster-test01:1186 --initial
Do the restart for remaining three data nodes. Let’s look at the cluster at this stage:
From the above image, we can see that all the new nodes have been finished their restart process.
Step 8: Create new nodegroups
From the above step, we can see that new nodes are added but not part of any nodegroup (no nodegroup). Let’s create a nodegroup to add these new nodes. This can be achieved through ‘create nodegroup’ command.
ndb_mgm> create nodegroup 37,38
ndb_mgm> create nodegroup 39,40
where 37, 38 and 39, 40 are the node id of newly added data nodes.
After the nodegroups created, let’s look at the cluster state:
From the above image we can see that nodegroup 2 and 3 has been created.
Now in the cluster we have 8 data nodes and out of which 4 data nodes which are recently added are empty while the other 4 data nodes contains all the table data. So let’s redistributed the data among all the data nodes. This can be done through MySQL command ‘ALTER TABLE ... REORGANIZE PARTITION’. This command should run for all the tables in each database.
mysql> ALTER TABLE t1 REORGANIZE PARTITION;
After the table reorganization is completed, let’s check the memory report from the management client i.e.
ndb_mgm> all report memory
From the above image we can see that table data has been redistributed among all the data nodes. The old data nodes (where memory usages is still showing 31%) is not yet released the space that it occupied after the table reorganization. This space can be reclaim by the command ‘optimize table’.
Step 10: Reclaim the space from the old data nodes
As we saw above, even after reorganization finished, the space is not yet released by the old data nodes (from memory report: 31% usages). This can be achieved through ‘optimize table’ command. This command should run for all the tables in each database.
mysql> OPTIMIZE TABLE t1;
Now let’s check the memory report from the cluster:
From the above image, we can see that, for the old data nodes, memory usages has been reduced from 31% to 25% i.e. 6% of memory space reclaimed by the optimize table command.
Let’s look at the cluster once again after adding 4 new data nodes:
Now it is an ‘8’ nodes cluster scaling from a ‘4’ nodes cluster without any downtime to the running cluster.
This concludes our discussion on MySQL NDB Cluster scaling.


This comment has been removed by the author.
ReplyDeleteHI Saroj ,
ReplyDeleteI'm looking for data node deletion my requirement to scale out the 4 data nodes cluster to 2 data nodes , Please provide me steps.
Thanks in advance.
This comment has been removed by a blog administrator.
ReplyDeleteThis comment has been removed by a blog administrator.
ReplyDelete