MySQL NDB Cluster Installation Through Docker
In this post, we will see how to setup MySQL NDB Cluster from a docker image. I assume that the reader has some basic understanding of docker and its terminology.
Steps to install MySQL NDB Cluster:
Let's create a MySQL NDB Cluster with the following environment:
Step 1: Get the MySQL NDB Cluster docker image on your host
Users can get the MySQL NDB Cluster image from github site (link). Then select your required cluster version for download.
Note: By default MySQL NDB Cluster 8.0 GA version image docker will pull or by mentioning tag:latest also point to latest cluster image which is 8.0 at the moment. If user wants to pull older versions of cluster images i.e. 7.5, 7.6 then mention that older version in tag (tag:7.5). Cluster version 7.5 onwards supported on docker.
Let's run below command to get the latest cluster image:
host > docker pull mysql/mysql-cluster:latest
Steps to install MySQL NDB Cluster:
Let's create a MySQL NDB Cluster with the following environment:
- MySQL NDB Cluster version (Latest GA version)
- 1 Management Node
- 4 Data Nodes
- 1 Mysqld Server
- Configuration slots for upto 4 additional API nodes
Step 1: Get the MySQL NDB Cluster docker image on your host
Users can get the MySQL NDB Cluster image from github site (link). Then select your required cluster version for download.
Note: By default MySQL NDB Cluster 8.0 GA version image docker will pull or by mentioning tag:latest also point to latest cluster image which is 8.0 at the moment. If user wants to pull older versions of cluster images i.e. 7.5, 7.6 then mention that older version in tag (tag:7.5). Cluster version 7.5 onwards supported on docker.
Let's run below command to get the latest cluster image:
host > docker pull mysql/mysql-cluster:latest
OR:
host > docker pull mysql/mysql-cluster
host> docker pull mysql/mysql-cluster:7.5

Let's wait for the download to finish.

Cluster image has been pulled successfully by docker. Its always good to check if any older images of same version is also exist. In that case, while pulling the same cluster image, docker will prompt that “Image is up to date ... (look for below image)”.

Step 2: Create a docker network
Next step is to create an internal docker network so that all the containers will use it to communicate each other.
Host> docker network create cluster_8.0 --subnet=192.168.0.0/16
Here, cluster_8.0 is the new internal docker network domain. You can assign any name to it.

Let's check whether the above network is created or not:
Host> docker network ls
This will list out all the networks exist in the docker. One can see that our network ‘cluster_8.0’ is also listing.

Step 3: Prepare the cluster specific configuration files (config.ini, my.cnf)
By default docker image will have a minimal configuration files called my.cnf (/etc/my.cnf) and mysql-cluster.cnf (/etc/mysql-cluster.cnf). Let's create our own cluster configuration file (mysql-cluster.cnf) and let docker used it when we start our cluster.
A sample custom mysql-cluster.cnf file looks like below:
[ndbd default]
NoOfReplicas = 2
DataMemory= 1G
#Below LogLevel settings will help in debugging an issue
LogLevelStartup = 15
LogLevelShutdown = 15
LogLevelConnection = 15
LogLevelInfo = 15
LogLevelError = 15
LogLevelNodeRestart = 15
LogLevelCheckpoint = 15
[ndb_mgmd]
#Management node 1
NodeId = 254
HostName = 192.168.0.2
[ndbd]
#Data node 1
NodeId = 33
HostName = 192.168.0.3
[ndbd]
#Data node 2
NodeId = 34
HostName = 192.168.0.4
[ndbd]
#Data node 3
NodeId = 35
HostName = 192.168.0.5
[ndbd]
#Data node 4
NodeId = 36
HostName = 192.168.0.6
[mysqld]
#API node 1
NodeId = 24
[mysqld]
#API node 2
NodeId = 25
[mysqld]
#API node 3
NodeId = 26
[mysqld]
#API node 4
NodeId = 27
Note:
host> docker pull mysql/mysql-cluster:7.5
Let's wait for the download to finish.
Cluster image has been pulled successfully by docker. Its always good to check if any older images of same version is also exist. In that case, while pulling the same cluster image, docker will prompt that “Image is up to date ... (look for below image)”.
Step 2: Create a docker network
Next step is to create an internal docker network so that all the containers will use it to communicate each other.
Host> docker network create cluster_8.0 --subnet=192.168.0.0/16
Here, cluster_8.0 is the new internal docker network domain. You can assign any name to it.
Let's check whether the above network is created or not:
Host> docker network ls
This will list out all the networks exist in the docker. One can see that our network ‘cluster_8.0’ is also listing.
Step 3: Prepare the cluster specific configuration files (config.ini, my.cnf)
By default docker image will have a minimal configuration files called my.cnf (/etc/my.cnf) and mysql-cluster.cnf (/etc/mysql-cluster.cnf). Let's create our own cluster configuration file (mysql-cluster.cnf) and let docker used it when we start our cluster.
A sample custom mysql-cluster.cnf file looks like below:
NoOfReplicas = 2
DataMemory= 1G
#Below LogLevel settings will help in debugging an issue
LogLevelStartup = 15
LogLevelShutdown = 15
LogLevelConnection = 15
LogLevelInfo = 15
LogLevelError = 15
LogLevelNodeRestart = 15
LogLevelCheckpoint = 15
[ndb_mgmd]
#Management node 1
NodeId = 254
HostName = 192.168.0.2
[ndbd]
#Data node 1
NodeId = 33
HostName = 192.168.0.3
[ndbd]
#Data node 2
NodeId = 34
HostName = 192.168.0.4
[ndbd]
#Data node 3
NodeId = 35
HostName = 192.168.0.5
[ndbd]
#Data node 4
NodeId = 36
HostName = 192.168.0.6
[mysqld]
#API node 1
NodeId = 24
[mysqld]
#API node 2
NodeId = 25
[mysqld]
#API node 3
NodeId = 26
[mysqld]
#API node 4
NodeId = 27
Note:
One should carefully allocate all memory related configuration parameters like DataMemory, TransactionMemory, SharedGlobalMemory etc based on your host availability free memory (RAM), excessive memory allocation might cause issues in starting cluster. If we are not sure about which config params we should use then we should run cluster with default configuration cluster file, but then it would be a 2 node cluster. Each configuration parameters have some default value so upon doubt, we should just mention the required HostName and NodeId in the cluster config file and leave others parameters as it is (default).
Step 4: Start the management server with custom cluster configuration file (mysql-cluster.cnf)
Next step is to start the management server (mgmt1). From the below command, HOST_PATH is path of required files on host that are mapped with container files. On my host, HOST_PATH= /Users/sarojtripathy/docker/mysql-tree/8.0
HOST> docker run -d --net=cluster_8.0 –ip=192.168.0.2 \
--volume=HOST_PATH/mysql-cluster.cnf:/etc/mysql-cluster.cnf \
--volume=HOST_PATH/ndb/node1/mgmt1/ndb_254_cluster.log:/ndb_254_cluster.log \
--name=mgmt1 mysql/mysql-cluster ndb_mgmd --initial

From the above image:
mysql-cluster.cnf: This is the custom cluster configuration file and is mapped to default cluster configuration file (/etc/mysql-cluster.cnf)
ndb_254_cluster.log: This is the file we have to create on the required path (empty file) and then map to internal cluster log file. The idea is to get all the cluster log messages to outside the container so that we can look at the logs during any issues that occurs in cluster. Alternatively we can look at the cluster logs thru docker command:
HOST> docker logs -f mgmt_container_name
Let's check the status of the management node from below command:
HOST> docker ps -a | grep -i mgmt1

We can see that management node container is up. Also we can start the mgmt client (ndb_mgm) to see if management node is up and running or not.
HOST> docker run -it --net=cluster_8.0 mysql/mysql-cluster ndb_mgm

We can see that management node (ID:254) is up and running and 4 data nodes are yet to start.
Let's open the log file (ndb_254_cluster.log) and check if we can see the cluster logs. I have created a file (ndb_254_cluster.log) on my host to capture cluster logs.

Step 5: Start all the data nodes
Run the below command in each data node. Make sure we have changed the node id, name for each data node.
Data Node 1:
HOST> docker run -d --net=cluster_8.0 \
--name=ndbmtd1 \
-e '--ndb-connectstring=192.168.0.2:1186' \
mysql/mysql-cluster ndbmtd --nostart --nodaemon
Data Node 2:
HOST>docker run -d --net=cluster_8.0 \
--name=ndbmtd2 \
-e '--ndb-connectstring=192.168.0.2:1186' \
mysql/mysql-cluster ndbmtd --nostart --nodaemon
Data Node 3:
HOST>docker run -d --net=cluster_8.0 \
--name=ndbmtd3 \
-e '--ndb-connectstring=192.168.0.2:1186' \
mysql/mysql-cluster ndbmtd --nostart --nodaemon
Data Node 4:
HOST>docker run -d --net=cluster_8.0 \
--name=ndbmtd4 \
-e '--ndb-connectstring=192.168.0.2:1186' \
mysql/mysql-cluster ndbmtd --nostart --nodaemon

It is necessary to run all the data nodes with –nodaemon option as running data nodes with daemon option in a docker container is currently not supported. So all the logs generated from data nodes are redirected to stdout. To gather these logs, we have to use docker command:
HOST> docker logs -f ndbmtd_container_name
Let's check the status of data nodes from the management client (ndb_mgm).
HOST> docker run -it --net=cluster_8.0 mysql/mysql-cluster ndb_mgm

The status ‘not started’, shows that data node processes are running, but are not attempting to start yet. To start a data node process, issue a ‘start’ command from the management client. We can also issue ‘all start’ command to start all the data nodes.

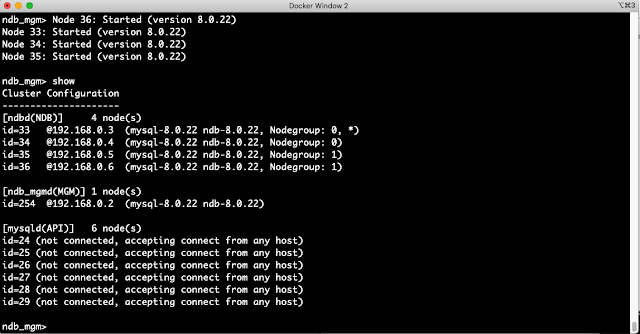
We can see that all data nodes are in ‘starting’ state and then its changed to ‘Started’ state. Let's look at the cluster status once again.
As data nodes are started with ---nodaemon option so the logs won’t accumulate on any files rather it will redirect to stdout. So the only way to gather these logs into a file is to use docker command.
HOST> docker logs -f ndbmtd1 | tee ndbmtd1_log
The above command will create a file called ‘ndbmtd1_log and redirect all the logs into it and at the same time, displays the same logs on the stdout i.e. in host terminal. So we can do the same for all the data nodes that are running. This will help during debugging any issues while cluster is up and running.

Step 6: Start the Mysqld Server
Run the below command for the mysqld node(s). Make sure we have changed the ip, name for each mysqld node(s). On my host, HOST_PATH= /Users/sarojtripathy/docker/mysql-tree/8.0/
HOST> docker run -d --net=cluster_8.0 \
-v HOST_PATH/ndb/node1/mysqld_data1:/var/lib/mysql \
-v HOST_PATH/ndb/node1/mysqld.log:/var/log/mysqld.log \
--name=mysqld1 --ip=192.168.0.10 -e mysql_random_root_password=true \
mysql/mysql-cluster mysqld --log-error=/var/log/mysqld.log

Like management log file, here I have also created an empty mysqld.log file on my local host and mapped into mysqld container internal log file (/var/log/mysqld.log). Also I have mapped mysql data files ‘/var/lib/mysql’ to local file ‘mysqld_data1’. Let's verify the mysqld logs from the host.

Let's check the status of mysqld node(s) from the management client (ndb_mgm):

From the above image, we can see that our new cluster is now up and running ... :)
Step 7: Start the mysql client
Before starting the mysql client, we need to get the password that has already generated during mysqld initialisation phase. Then copy this password and pass it to connect the server.
HOST> docker logs mysqld1 2>&1 | grep PASSWORD
The above command will show you the password.

Then enter above password to connect to the mysqld server.
HOST> docker exec -it mysqld1 mysql -uroot -p
Enter password: <== Enter the password that we have copied above.

Next step is to change the password to our own password. Please look for the below command:
mysql> ALTER USER 'root'@'localhost' IDENTIFIED BY 'root123';
mysql> exit;

Now start the mysql client by logging with new password.

Step 8: Create database, table, rows transactions on MySQL NDB Cluster
Let's create a database, a table and insert few rows into the table.

Let's insert few rows into the table ‘t1’ and then check the rows count.


Let's delete one row from the table and check the rows count again.
So from the above image, we see that we are able to perform transactions on a table that is reside in MySQL NDB Cluster.
At the end, let's check the cluster status after doing all the table operations.

We can see that cluster is up and running. This concludes our discussion of MySQL NDB Cluster installation through docker.
Step 4: Start the management server with custom cluster configuration file (mysql-cluster.cnf)
Next step is to start the management server (mgmt1). From the below command, HOST_PATH is path of required files on host that are mapped with container files. On my host, HOST_PATH= /Users/sarojtripathy/docker/mysql-tree/8.0
HOST> docker run -d --net=cluster_8.0 –ip=192.168.0.2 \
--volume=HOST_PATH/mysql-cluster.cnf:/etc/mysql-cluster.cnf \
--volume=HOST_PATH/ndb/node1/mgmt1/ndb_254_cluster.log:/ndb_254_cluster.log \
--name=mgmt1 mysql/mysql-cluster ndb_mgmd --initial
From the above image:
mysql-cluster.cnf: This is the custom cluster configuration file and is mapped to default cluster configuration file (/etc/mysql-cluster.cnf)
ndb_254_cluster.log: This is the file we have to create on the required path (empty file) and then map to internal cluster log file. The idea is to get all the cluster log messages to outside the container so that we can look at the logs during any issues that occurs in cluster. Alternatively we can look at the cluster logs thru docker command:
HOST> docker logs -f mgmt_container_name
Let's check the status of the management node from below command:
HOST> docker ps -a | grep -i mgmt1
HOST> docker run -it --net=cluster_8.0 mysql/mysql-cluster ndb_mgm
Let's open the log file (ndb_254_cluster.log) and check if we can see the cluster logs. I have created a file (ndb_254_cluster.log) on my host to capture cluster logs.
Step 5: Start all the data nodes
Run the below command in each data node. Make sure we have changed the node id, name for each data node.
Data Node 1:
HOST> docker run -d --net=cluster_8.0 \
--name=ndbmtd1 \
-e '--ndb-connectstring=192.168.0.2:1186' \
mysql/mysql-cluster ndbmtd --nostart --nodaemon
Data Node 2:
HOST>docker run -d --net=cluster_8.0 \
--name=ndbmtd2 \
-e '--ndb-connectstring=192.168.0.2:1186' \
mysql/mysql-cluster ndbmtd --nostart --nodaemon
Data Node 3:
HOST>docker run -d --net=cluster_8.0 \
--name=ndbmtd3 \
-e '--ndb-connectstring=192.168.0.2:1186' \
mysql/mysql-cluster ndbmtd --nostart --nodaemon
Data Node 4:
HOST>docker run -d --net=cluster_8.0 \
--name=ndbmtd4 \
-e '--ndb-connectstring=192.168.0.2:1186' \
mysql/mysql-cluster ndbmtd --nostart --nodaemon
It is necessary to run all the data nodes with –nodaemon option as running data nodes with daemon option in a docker container is currently not supported. So all the logs generated from data nodes are redirected to stdout. To gather these logs, we have to use docker command:
HOST> docker logs -f ndbmtd_container_name
Let's check the status of data nodes from the management client (ndb_mgm).
HOST> docker run -it --net=cluster_8.0 mysql/mysql-cluster ndb_mgm
The status ‘not started’, shows that data node processes are running, but are not attempting to start yet. To start a data node process, issue a ‘start’ command from the management client. We can also issue ‘all start’ command to start all the data nodes.
We can see that all data nodes are in ‘starting’ state and then its changed to ‘Started’ state. Let's look at the cluster status once again.
As data nodes are started with ---nodaemon option so the logs won’t accumulate on any files rather it will redirect to stdout. So the only way to gather these logs into a file is to use docker command.
HOST> docker logs -f ndbmtd1 | tee ndbmtd1_log
The above command will create a file called ‘ndbmtd1_log and redirect all the logs into it and at the same time, displays the same logs on the stdout i.e. in host terminal. So we can do the same for all the data nodes that are running. This will help during debugging any issues while cluster is up and running.
Step 6: Start the Mysqld Server
Run the below command for the mysqld node(s). Make sure we have changed the ip, name for each mysqld node(s). On my host, HOST_PATH= /Users/sarojtripathy/docker/mysql-tree/8.0/
-v HOST_PATH/ndb/node1/mysqld_data1:/var/lib/mysql \
-v HOST_PATH/ndb/node1/mysqld.log:/var/log/mysqld.log \
--name=mysqld1 --ip=192.168.0.10 -e mysql_random_root_password=true \
mysql/mysql-cluster mysqld --log-error=/var/log/mysqld.log
Like management log file, here I have also created an empty mysqld.log file on my local host and mapped into mysqld container internal log file (/var/log/mysqld.log). Also I have mapped mysql data files ‘/var/lib/mysql’ to local file ‘mysqld_data1’. Let's verify the mysqld logs from the host.
Let's check the status of mysqld node(s) from the management client (ndb_mgm):
From the above image, we can see that our new cluster is now up and running ... :)
Step 7: Start the mysql client
Before starting the mysql client, we need to get the password that has already generated during mysqld initialisation phase. Then copy this password and pass it to connect the server.
HOST> docker logs mysqld1 2>&1 | grep PASSWORD
The above command will show you the password.
Then enter above password to connect to the mysqld server.
HOST> docker exec -it mysqld1 mysql -uroot -p
Enter password: <== Enter the password that we have copied above.
Next step is to change the password to our own password. Please look for the below command:
mysql> ALTER USER 'root'@'localhost' IDENTIFIED BY 'root123';
mysql> exit;
Now start the mysql client by logging with new password.
Step 8: Create database, table, rows transactions on MySQL NDB Cluster
Let's create a database, a table and insert few rows into the table.
Let's insert few rows into the table ‘t1’ and then check the rows count.
Let's delete one row from the table and check the rows count again.
So from the above image, we see that we are able to perform transactions on a table that is reside in MySQL NDB Cluster.
At the end, let's check the cluster status after doing all the table operations.
We can see that cluster is up and running. This concludes our discussion of MySQL NDB Cluster installation through docker.


VERY easy to understand, thank you. keep posting!!
ReplyDeletedocker training
kubernetes training
This comment has been removed by a blog administrator.
ReplyDeleteThis comment has been removed by a blog administrator.
ReplyDeleteThis comment has been removed by a blog administrator.
ReplyDeleteThis comment has been removed by a blog administrator.
ReplyDeleteThis comment has been removed by a blog administrator.
ReplyDeleteThis comment has been removed by a blog administrator.
ReplyDeleteThis comment has been removed by a blog administrator.
ReplyDeleteThis comment has been removed by a blog administrator.
ReplyDelete